Sunday, October 25, 2009

Collage


There is something really amazing and magical that happens when you place art materials 
on a table and let a child investigate, create, imagine, explore on their own.
Today's inspiration is all Honeypie.  
Digging into our collage materials box... 


A pumpkin boy is born !


~happy halloween!


Today is brought to you by the Letter B!


The theme for this week's unplugged project at "unplug your kids" was the letter "B".
Though we did not make something "B" letter specific...
here is our week totally filled with tons of "letter B" things we did...


Ballet
Best friends


Beautiful me


BAKING!

Best chocolate chip cookies


Baking Bread for:

Big Boo Jack-o-lanterns


Baked and mummified organic/nitrate free hot dogs


Bread Bones


We did a lot of "BITING" into lots of delicious things to eat!!

BOOOOOO!


This week was brought to you by the letter "B".

~birdycake!


Saturday, October 24, 2009

Baby Pumpkin dress-up


Here is a super cute project Honeypie and I came up with this week, as an alternative to the traditional Jack-o-lantern carving.
Our four baby pumpkins decide to dress up for halloween as...
a witch, a ghost, a bat and spider!


If you would like to make this project too...

all you need is:

baby pumpkins
chenille pipe cleaners
glue and a small brush for applying glue
seamstress pins (they are a pin with a colored plastic ball at the end)
black beads (for making jewelry)
toothpicks
scraps of black felt
white batting or wool roving
yarn

(These are the pipe cleaners we loved, the dress makers pins close up and the beads we used with a hole not too big so the pins can hold them in place)


To make the eyes, mark with a pencil where you will like the eyes to be and then lace a pin with a bead and push it into the pumpkin on the place you marked with the pencil.


To make the spider legs I used a toothpick to pre-punch the holes for honeypie to press the pipe cleaners into.


To make the ghost, we placed white batting over the baby pumpkin lightly so you can still see the pumpkin beneath.


To make the bat, I pre-cut the wings out of felt, and honeypie helped me glue the toothpick into the sections that were going to be pressed into the pumpkin. She laced the beads for the eyes and we used 2 pieces of rice for the bat teeth. All the smiles are made out of felt and glued on to the pumpkins.


For the witch, we used a long wooden stick and attached strips of yarn and tied a strand of yarn to secure the broom. We made the hat out of black felt and glued it in place.


For the ghost, we placed the facial features after putting the batting on the pumpkin and glued the smile onto the batting.


Here they are ready for their halloween party parade!!!


~happy halloween crafting!


Thursday, October 22, 2009

Pumpkin Pot Pies (in a pumpkin!)


I first should say that I have been collecting Martha Stewart magazines for 19  years and though my husband would love to see my stacks and stacks recycled... (more room!) and has offered lovingly to use his computer brilliance to scan and store my favorite recipes or projects... I can't seem to part with them .  Post-it filled, folded dog-eared pages, food stained and faded, they proudly sit everywhere in my house... (sorry honey)! ^_^

Today's recipe for pumpkin chicken pot pies comes from her 1992 fall issue.  (10 post-its in it!) and though the recipe has no pictures (rare!) I think this came out beautifully with a little imagination on my part and by the way... absolutely delicious!
The recipe called for making a thyme infused pate brisee. (Pate brisee is the French version of classic pie or tart pastry.) 

Delicious!


Chicken Pot Pie

INGREDIENTS:

6 sugar pumpkins or acorn squash (1 to 2 pounds each)
Salt and ground black pepper to taste
6 tablespoon butter
6 tablespoons all-purpose flour
3 cups canned chicken broth
8 ounces frozen mixed vegetables 
(I did NOT USE that: instead i used 4 potatoes, 3 carrots cubed and some mushrooms.)
8 ounces frozen pearl onions or chopped onions 
( I used regular onions 2... i do not like pearl onions)
4 cups cooked chicken, cut into bite-size pieces
1 tablespoon dried thyme
1 tablespoon dried leaf sage
2 tablespoons finely chopped fresh parsley
1 refrigerated pie crust
1 egg beaten with 1 tablespoon milk for egg wash


PREPARATION: 
1.Preheat oven to 375°F. Slice tops off pumpkins. Remove seeds and pulp. Sprinkle insides of pumpkins with salt and pepper. Place pumpkins cut side up on a baking sheet. Cover pumpkins tightly with foil. Bake 25 to 30 minutes or just until skin is easily pierced with knife. Remove from oven. Reduce oven temperature to 350°F.

2. Melt butter in large saucepan over medium heat. Add flour and cook, stirring constantly until well blended, about 1 minute. Add broth and stir constantly until mixture is thick and bubbly, about 5 minutes. Add vegetables, onions, chicken and herbs. Add salt and pepper to taste. Remove from heat and divide mixture evenly among cooled pumpkin shells (approximately 1-1/2 cups per pumpkin).

(I actually did not follow part 2 exactly.  I sauteed the onions with some olive oil and added the chicken (chicken thighs boneless) and browned both (about 5 minutes) I then added carrots, potatoes, and the mushrooms... I then added the chicken broth and then the flour and simmered) 

3. Unwrap pie dough and place on lightly floured work surface. With a sharp paring knife, cut (12) 6-inch-long, 1/2-inch-wide strips, and roll dough to resemble tendrils. Cut small leaf shapes, and with back of knife, gently press lines into leaf to resemble veins.

4. Use egg wash as glue to attach dough strips, twisting gently to form coils. Attach leaves. Brush all decorations with egg wash. Return pumpkins to oven and bake about 30 minutes, or until pie dough is golden and filling is hot and bubbly.


Thyme Pate Brisee (pie dough)

INGREDIENTS

Makes 1 double-crust or 2 single-crust 9- to 10-inch pies.

2 1/2 cups all-purpose flour
1 teaspoon salt
1 teaspoon sugar
1 cup (2 sticks) unsalted butter, chilled and cut into small pieces
2 Tb of fresh thyme leaves
1/4 to 1/2 cup ice water

DIRECTIONS

In the bowl of a food processor, combine flour, salt, and sugar. Add butter, and process until the mixture resembles coarse meal, 8 to 10 seconds.  Add the thyme.
With machine running, add ice water in a slow, steady stream through feed tube. Pulse until dough holds together without being wet or sticky; be careful not to process more than 30 seconds. To test, squeeze a small amount together: If it is crumbly, add more ice water, 1 tablespoon at a time. 
Divide dough into two equal balls. Flatten each ball into a disc and wrap in plastic. Transfer to the refrigerator and chill at least 1 hour. Dough may be stored, frozen, up to 1 month.

*(Pressing the dough into a disc rather than shaping it into a ball allows it to chill faster. This will also make the dough easier to roll out, and if you freeze it, it will thaw more quickly.)

Visit the Martha Stewart website for more great recipes!!


Monday, October 19, 2009

pumpkin pie bites


OH "bakerella"...
here's my pumpkin pie bites attempt,
thought they look NOTHING like yours... (very tasty though!)
oh, what happened????

mmmm.....sigh...

for great baking inspirations and bakerella's recipe click (here).

^~^
birdycake

Friday, October 16, 2009

Booooo!

Today's ghost cookie inspiration comes via "Inside a black apple", 
(whose dollies and illustrations we love and covet! ). 
We have been waiting to make these since last fall... so we were very excited to begin!
Emily Martin is a crafter and illustrator, (you can buy her dolls on etsy) but if you'd like to make one of your own... you can watch Emily makes her dollies (here
on the Martha Stewart show. 
She also has the tutorials online at the Martha Stewart site.
The cookies called for the de-construction of a regular cookie cutter into a "black apple ghost"  (a ghosty character from her illustrations)!

Below is our result!  Super cute!!!!

Hammering a new cookie cutter was not too hard.... sealed it with duck tape.


BOOOOOO!!!!


We made some girly ones too...


~ birdycake


Tuesday, October 13, 2009

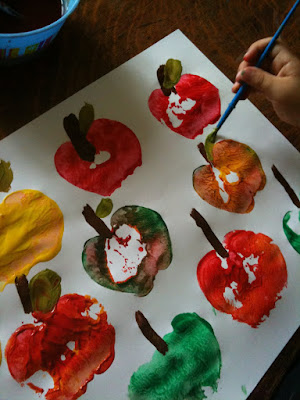
Apple printing


OK... here is another "apple" idea...
(and then we're off and on to pumpkins!!!)

Printing with apples. All you need is paints and an apple!

Slice the apple in half.
Paint on the apple the color you wish it to be.
(You can also just dip the apple front in paint)

Press the apple onto paper.


Use a paint brush to add seeds or a stem and leaves!


*ps...We have also tried printing with dried sun flowers. 
If interested... (see here) !


Apple jellies (pate de fruit)

This beautiful season continues with more of the gorgeous apples of fall.
And as we enjoy our sweet bounty, we continue to find new ways to use our apples.
Today's recipe for "apple fruit paste" comes via Alice Waters
" The Art of Simple Food", though I had to adjust the recipe a bit to make it work for me. (I did make it 3 times...!)

Jellies, also known as fruit paste or pate de fruit are beautiful bite size sweet fruit treats.
Fruits such as apples, plums, and berries are slowly cooked in sugar to a concentrated puree and then cooled in a pan until set and firm. These jellies can then be cut into all sorts of shapes, rolled in sugar and served as candies or as a sweet dessert treat.

If you would like to make these you will need about
8 medium apples.
Wash, quarter and core them and leave the peels on.
Place them in a pot with one cup of water and cook over medium heat for about 20 minutes.
Remove from the heat and take the apples out (without the water) and pass the mixture through a food mill with as much as the peels as you can. It will give the mixture a redish color depending on what type of apples you are using.

Lightly rub a bit of vegetable oil on a pan (mine was 6" x 8") and place a piece of parchment paper on the bottom of the pan. Lightly oil the parchment paper too.


After you have passed the apple mixture through a food mill, return the puree to the pot and stir in 1 cup of sugar and the juice of a small lemon. Simmer this mixture on low heat stirring constantly so as to not let it stick to the bottom of the pot and burn. This will take about 1 hour so find something fun to do near the stove because you will be there for a while :). After the hour, I noticed that my mixture was taking a while to thicken... so i added 2 tablespoons of powdered pectin to help with the gelling process and continued to stir and cook for another 20 minutes.

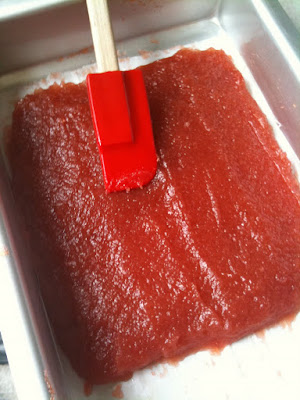
I removed the mixture from the pot and poured it into my prepared lightly oiled pan and smoothed it with a spatula.


I let the puree sit on my counter and cool for several hours. When it was cooled I inverted the puree into another parchment lined plate and placed in the refrigerator overnight.
The next day I cut the square into bite size pieces and coated them with sugar... but you can leave that step out... they are sweet as they are!


Enjoy!


LinkWithin

Related Posts with Thumbnails