Sunday, May 31, 2009

the chia tree has started to bloom!!!


Looks like he is starting to sprout in all the wrong places but i am not surprised.  
He is beginning to have a goatee. 
A hipster chia tree.

lazy sunday...


Today finds us inside...   a nice lazy sunday

Honeypie is in her playroom, laying on her cot with mama's ipod, listening to charlotte's web.

Daddy has made a new nook for his turntables and is happily remixing music.

And mama?....  is in the kitchen figuring out the science of sugar!!
(OH why can it be more organic? all this math and numbers... )

My idea of the homemade lollipop making was harder than i thought and i had some interesting results but none which were actual edible lollipops.  
I am sure we will get rolling once i get a ...   "CANDY THERMOMETER"!!!  

(note to self: ***need a candy thermometer, pronto.  Seems that is the mystery secret.)

I started with a basic recipe i had in a booklet...

one cup sugar
1/2 cup water
1/3 cup corn syrup
and 1/4 tsp of cream of tartar

I put it all in a pan on high heat, stirring and waited for it to boil.
Once it boiled i waited for some signs of it kind of reaching a 300* f degrees... i stuck in a digital thermometer i had in a drawer and melted it (the thermometer) at 235*f ...
so then my result was... burnt sugar lollipops. (too much heat)
(here's the "dark" entry for "unplug your kids!")


mmmm.... those look NOTHING like the picture...


On my second try, i removed the pot from  the heat once the mixture was boiling heavily (hoping it had reached 300* f ) and that resulted in lollipops that never hardened (not enough heat) 


but the sugar was pliable enough to be molded, so i played around with that.


ahhhh live and learn.

I did try to insert some fondant figures inside the lollipops and found out that they did not dissolve, so that was a happy finding.


I will try again this week... this time with my brand new candy thermometer  that i am going to purchase!

and ps...here's a good lollipop recipe (here)!


Afterwards we did some artsy things for honeypie's "uniqua"...

Some body painting by daddy


Honeypie's first "kind-of" sewing project... a new dress for "uniqua".  We took a cloth bag we had gotten as a present and honeypie trimmed the bottom off and made holes on the sides for the arms...
Tadahhhhh... a dress!   I thought that was pretty creative on her part!


and also a drawing of "uniqua" for "uniqua"!

(... can you tell who we are in love with at the moment? ) 
:)


as night fell... 
a glass of red wine and roasted rosemary potatoes 
and we sat on the deck to enjoy the last of our lazy sunday!

Great day!


Tuesday, May 26, 2009

making cake

Hi there... 
its been a while since i've posted...
been  busy here making cake!
Just thought i'd share some of my recent creations...
Honeypie has been very eager to make cake too... 
so she says she has been "practicing with playdough" to prepare for her first "fondant" experience.  
I am going to have her work on some cupcakes to start.  
Here are some of my cakes as well as some of honeypie's  (monsters vs aliens) playdough creatures that she will later make out of fondant for her own "cake"!


and some of honeypie's creatures... 


Wednesday, May 20, 2009

gardening and chia pets...


This is my husband's and daughter's idea of gardening...
planting beautiful delicious tomatoes. 
(They are fantastic those 2!)


ME?
I have a black thumb.
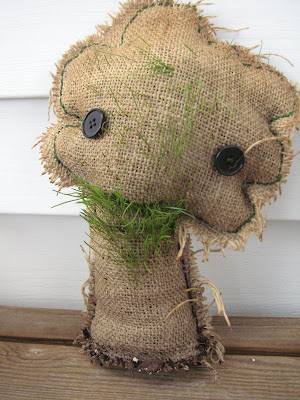
This is my idea of gardening...

A tree chia pet!!  (see below)

I was inspired by "Ordinary life magic" who made grass heads using old socks and buttons! (very cute)  
I decided to make ours a tree and used burlap instead and embroidered on top of it .
Lets see if it will actually sprout any greenery!!!  We'll have to wait and see.

If you'd like to make one too, here is what I did... 
You need embroidery thread, a piece of burlap 
(its good because it has wide holes for the grass to sprout through), and an embroidery needle.  You will also need potting soil and seeds.  We used grass seeds.


Draw your image on the burlap with a pencil or marker.  
Add a base to the bottom with more burlap,  so that the tree will stand. 
Sew the bottom closed
.  

Embroider all around your image, 
BUT leaving a hole at the top open where you will put the soil and seeds.


Add soil all the way to the trunk top

Sprinkle some seeds around the perimeter of the tree and drop more soil in the middle.  
You will be layering soil then seeds till you reach the top.


 Sew the top closed.

 
Spray with water daily and leave in the sun!


Hopefully you will see buds soon and your chia tree will look green and lush with leaves!  
I'll keep posted on our progress....
Hopefully you do not need a green thumb to make these seeds grow!


Ahhhh... he is beginning to sprout!


In the mean time ... 
while we wait...

  
Always a beautiful beautiful book.

"Once there was a tree....
and she loved a little boy.
And everyday the boy would come
and he would gather her leaves
and make them into crowns
and play king of the forest.
He would climb up her trunk
and swing from her branches
and eat apples.
And they would play hide-and-go-seek.
And when he was tired,
he would sleep in her shade.
And the boy loved the tree....
very much.
And the tree was happy..."


Tuesday, May 19, 2009

Sun


This week at "unplug your kids" the challenge was... "the sun".  
So what did we come up with?  
First, we decided to start  with one of our favorite books by Elsa Beskow called "the sun egg"
It is a story about a little wood elf who happens to find something quite mysterious in the woods and she thinks its an egg from the sun! (its really a juicy orange) The illustrations in the book are lovely and the story is too.  
We sat down and chomped on some oranges right after our read.


We then went on to make our own "sun egg" ... 
what did it look like?  
We hard boiled an egg.  
Used turmeric to dye it...
Then placed some parsley leaves in with the egg into a stocking and 
dipped it in the turmeric dye for 30 minutes...


And this is what we got... 
OUR SUN EGG.


For dinner we also made some "sunny" risotto... all inspired by honeypie.  
She wanted a bit of green (peas),  a bit of yellow  (corn, butternut squash and cheddar),  as  well as some chicken broth and parmesan cheese.... well seasoned and YUM.


These were our "sun "  adventures!

PS... if you'd like to make some "sunny" sun prints using sunflowers...
 read our previous instructions on how-to here!!


Wednesday, May 13, 2009

Mama's day


It was a wonderful mother's day weekend!   (Hope yours was too!)
 
We invited some friends over for a mama's day tea party and some art crafting... just the girls.  
We used my Alice in wonderland tea set which Honeypie had been aching to use and made some blueberry peach tea.  We also made some veggie platters and finger sandwiches... peanut butter and jam and cream cheese and cucumber.  The mama's had egg salad on whole grain and also some yummy tuna.
Would not have been complete without some cupcakes ofcourse in pink frosting!

Our craft which ended up taking a bit longer to make and is still "work in progress"  were a mama and kid- potato print  "matching" t-shits with a bouquet of spring flowers. 

It was a lovely day!


Getting ready for some "potato printing!"


 We added ribbons and buttons... 


We want to turn the t-shirts into art smocks and they still need ribbon for tying in the back... 
but i will post pictures when they are finished! 

Work in progress...

LinkWithin

Related Posts with Thumbnails